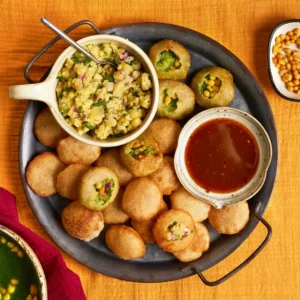
Dahi Bhalla Recipe: Crispy Outside, Melt-in-Mouth Inside
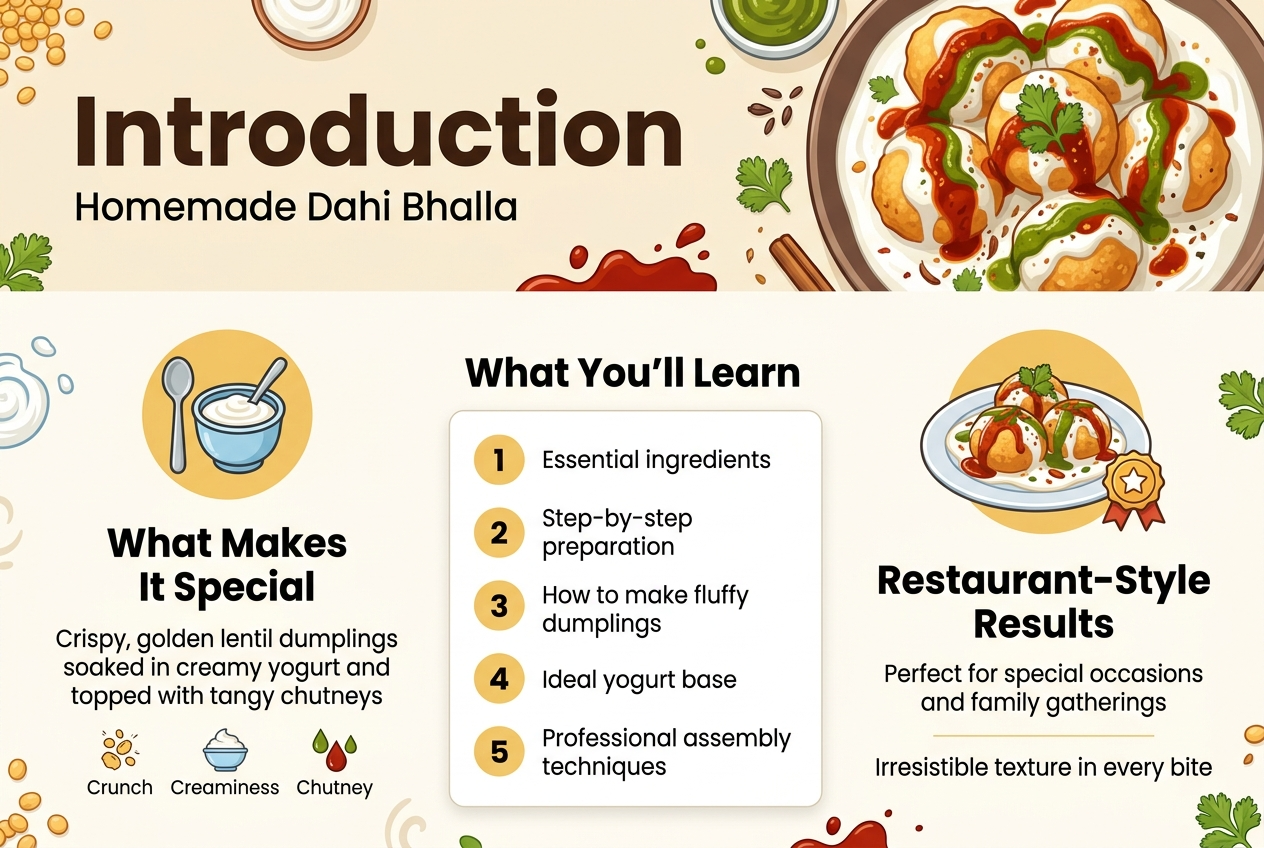
Home cooks who want to recreate authentic restaurant-style dahi bhalla will find this complete guide invaluable. We’ll walk you through the essential ingredients that make the difference between good and great dahi bhalla, plus share the step-by-step preparation method that guarantees perfectly fluffy dumplings every time. You’ll also discover how to create the ideal yogurt base and learn professional assembly techniques that turn your homemade dahi bhalla recipe into a showstopper worthy of any special occasion or family gathering.
Essential Ingredients for Perfect Dahi Bhalla
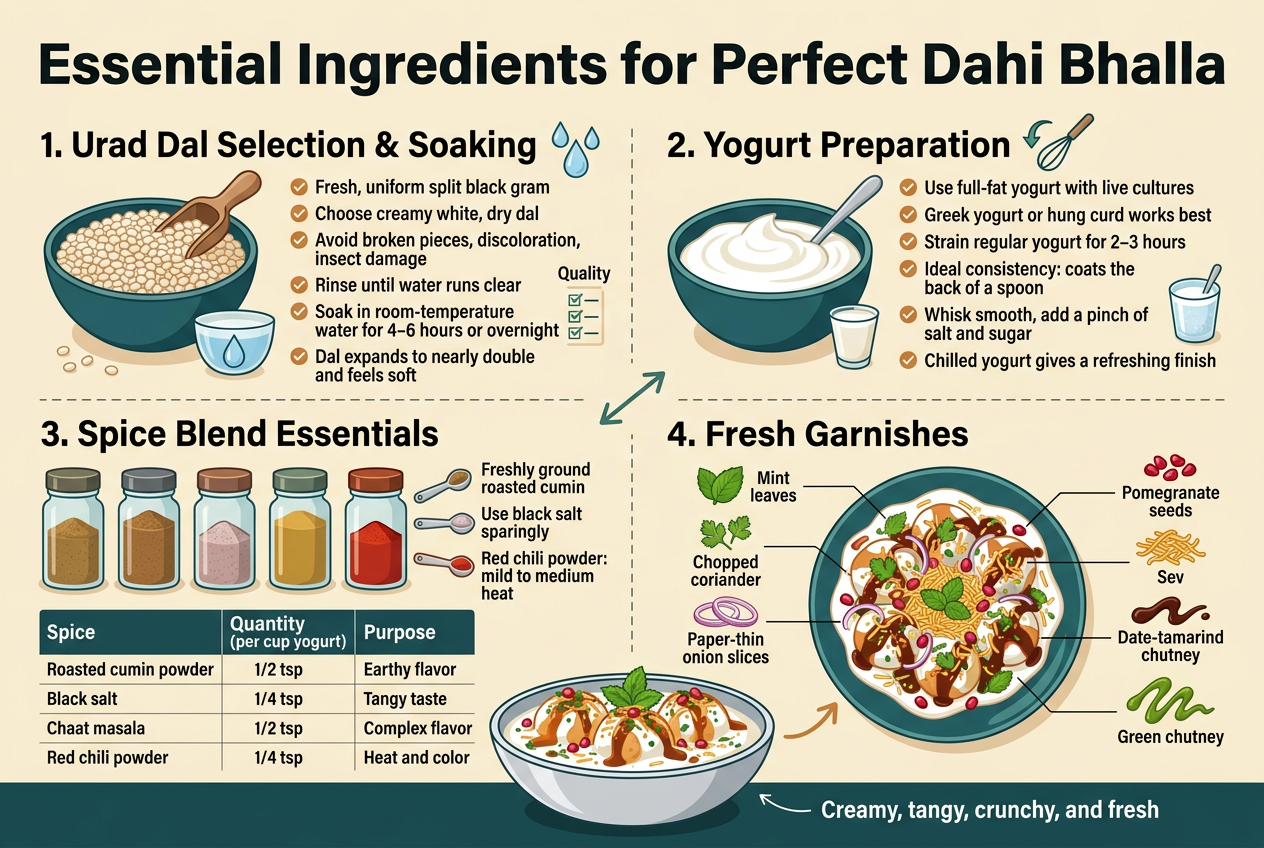
The foundation of any exceptional Dahi Bhalla recipe starts with premium urad dal. Choose split black gram (urad dal) that’s fresh, uniform in size, and free from discoloration or moisture. Whole urad dal works best for this recipe since it creates the perfect texture and binding properties needed for fluffy, spongy bhallas.
When shopping, look for dal that has a creamy white color and feels dry to the touch. Avoid packages with broken pieces or any signs of insect damage. Store-bought dal should ideally be used within 6-8 months of purchase for optimal results. Before soaking, rinse the dal thoroughly under cold water until the water runs clear, removing any debris or dust particles.
The soaking process is crucial – use room temperature water and soak for 4-6 hours or overnight. Properly soaked urad dal will expand to nearly double its original size and feel soft when pressed between your fingers. This ensures smooth grinding and better fermentation, which directly impacts the final texture of your bhallas.
Yogurt preparation and consistency requirements
Fresh, thick yogurt forms the heart of this beloved dish. Choose full-fat yogurt with live cultures for the best taste and texture. Greek yogurt or hung curd works exceptionally well, but regular yogurt can be thickened by straining through cheesecloth for 2-3 hours.
The ideal consistency should coat the back of a spoon without being too thick or runny. If your yogurt is too thin, it won’t cling properly to the bhallas. If it’s too thick, it becomes difficult to mix with spices and creates an unpleasant mouthfeel.
Whisk the yogurt until smooth and creamy, ensuring no lumps remain. Add a pinch of salt and sugar to balance the tanginess. Some chefs recommend adding a tablespoon of fresh cream for extra richness. Always use chilled yogurt for serving, as it provides a refreshing contrast to the soft, warm bhallas.
Spice blend essentials for maximum flavor
Creating the perfect spice blend elevates your Dahi Bhalla from good to extraordinary. The essential spices include roasted cumin powder, black salt (kala namak), chaat masala, and red chili powder. Each spice serves a specific purpose in building layers of flavor.
Roasted cumin powder adds an earthy, warming note that complements the creamy yogurt perfectly. Toast whole cumin seeds in a dry pan until fragrant, then grind them fresh for the best flavor. Black salt provides a distinctive tangy, sulfuric taste that’s synonymous with street food flavors.
Chaat masala brings complexity with its blend of dried mango powder, black pepper, and various aromatic spices. Use sparingly as it can overpower other flavors. Red chili powder should be mild to medium heat – the goal is to add color and gentle warmth, not overwhelming spiciness.
| Spice | Quantity (per cup yogurt) | Purpose |
|---|---|---|
| Roasted cumin powder | 1/2 tsp | Earthy flavor |
| Black salt | 1/4 tsp | Tangy taste |
| Chaat masala | 1/2 tsp | Complex flavor |
| Red chili powder | 1/4 tsp | Heat and color |
Fresh garnishing ingredients that make the difference
The right garnishes transform your Dahi Bhalla into a visually stunning and flavorful masterpiece. Fresh mint leaves, finely chopped coriander, and paper-thin onion slices are non-negotiable elements that add texture, color, and freshness.
Mint leaves should be young, bright green, and free from blemishes. Wash and pat them completely dry before use. Coriander leaves need similar treatment – choose bunches with firm stems and vibrant green color. Chop both herbs just before serving to maintain their bright flavor and appearance.
For the onion garnish, use small red onions or shallots sliced paper-thin using a sharp knife or mandoline. Soak the slices in ice water for 15 minutes to reduce their sharpness and add crispness. Pomegranate seeds provide bursts of sweetness and beautiful ruby-red color, while sev (fine gram flour noodles) adds essential crunch.Dahi Bhalla Recipe
Date-tamarind chutney and green chutney are the flavor bombs that tie everything together. The sweet-tangy date chutney balances the sourness of yogurt, while spicy green chutney made from mint, coriander, and green chilies adds a fresh kick that awakens the palate.
Step-by-Step Dahi Bhalla Preparation Method
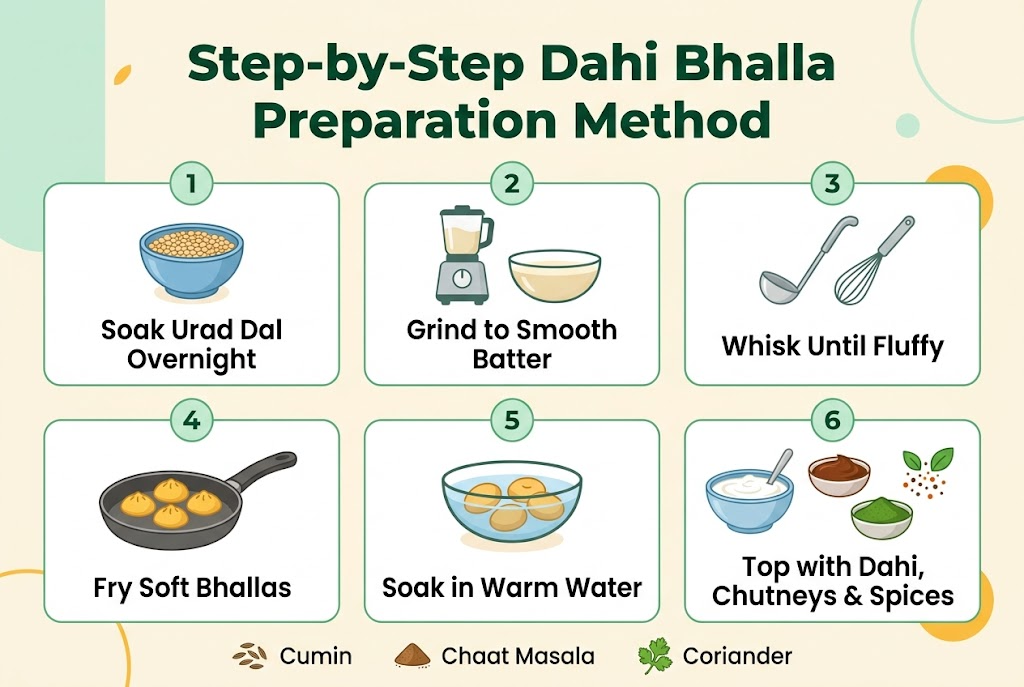
Start by soaking 1 cup of whole urad dal in cool water for 4-6 hours. The dal should nearly double in size, with each grain becoming plump and soft to the touch. Drain the water completely and rinse the dal 2-3 times until the water runs clear.
For grinding, use a wet grinder if available, as it produces the fluffiest texture. Add the soaked dal to your grinder with just 2-3 tablespoons of ice-cold water. The key here is minimal water – too much creates a thin batter that won’t hold its shape during frying. Grind in short 30-second bursts to prevent the motor from heating up, which can make your batter dense.
The perfect grind takes 8-12 minutes and results in a pale, airy mixture that feels light between your fingers. Test by dropping a small amount into water – it should float immediately if the batter is properly aerated.
Achieving the Ideal Batter Consistency for Crispiness
Your Dahi Bhalla Recipe success depends heavily on batter consistency. The mixture should be thick enough to hold its shape when spooned but light enough to feel almost mousse-like. When you lift the batter with a spoon, it should fall in thick ribbons rather than dropping like water.
Add salt and whisk vigorously in one direction for 3-4 minutes. This step incorporates air and creates the signature fluffy interior. The batter should increase in volume by about 25% after whisking. Test consistency by dropping a small portion into hot oil – it should immediately rise to the surface and start puffing.
If your batter feels too thick, add ice water one teaspoon at a time. Too thin? Let it rest for 10 minutes to absorb moisture naturally.
Deep Frying Techniques for Golden Exterior
Heat oil to exactly 325-350°F in a heavy-bottomed pan. This temperature range ensures the bhallas cook through while developing that coveted golden crust. Use a candy thermometer for accuracy, or test by dropping a small piece of batter – it should sizzle and rise immediately without browning too quickly.
Wet your hands with cold water before shaping each bhalla to prevent sticking. Gently slide rounded portions about the size of golf balls into the oil using wet fingers or a small ice cream scoop. Don’t overcrowd – fry only 4-5 pieces at a time to maintain oil temperature.
The bhallas will sink initially, then float and puff up beautifully. Fry for 6-8 minutes total, turning occasionally for even browning. They’re ready when they sound hollow when tapped and display a rich golden color all around.
Proper Cooling and Storage Before Serving
Remove fried bhallas with a slotted spoon and drain on paper towels for 2-3 minutes. Transfer to a wire rack to cool completely – this prevents soggy bottoms while maintaining the crispy exterior.Dahi Bhalla Recipe
Once cooled, gently squeeze each bhalla between your palms to remove excess oil. This step also creates small cracks that help them absorb the yogurt mixture later. Store cooled bhallas in an airtight container at room temperature for up to 2 days, or refrigerate for up to a week.
Before assembling your dish, soak the bhallas in warm water for 10-15 minutes to soften them slightly. This makes them easier to bite through while preserving some texture contrast.
Creating the Perfect Yogurt Base

The foundation of any exceptional Dahi Bhalla recipe starts with achieving the perfect yogurt consistency. Take fresh, thick yogurt and place it in a large mixing bowl. Using a wire whisk or fork, beat the yogurt vigorously in one direction for 2-3 minutes. This technique breaks down any lumps and creates that restaurant-style smooth, creamy texture that coats the bhallas beautifully.
For best results, use yogurt that’s been at room temperature for about 15 minutes before whisking. Cold yogurt tends to remain lumpy, while room temperature yogurt whips into a silky, uniform consistency much easier. Keep whisking until you see the yogurt transform from thick and chunky to smooth and flowing.
Seasoning with Salt and Sugar for Balanced Taste
The secret to memorable dahi bhalla lies in achieving the perfect sweet-tangy balance. Start by adding 1/2 teaspoon of regular table salt to every cup of whisked yogurt. The salt enhances the natural tartness and brings out the yogurt’s flavor depth.
Next comes the sugar – this is where many home cooks go wrong. Add 1 teaspoon of powdered sugar (or 1.5 teaspoons of regular granulated sugar) per cup of yogurt. Powdered sugar dissolves instantly, preventing any grittiness. Taste and adjust gradually – you want a subtle sweetness that complements rather than overpowers the tangy notes.
Mix the seasonings thoroughly and let the mixture rest for 5 minutes. This allows the salt and sugar to completely dissolve and marry with the yogurtDahi Bhalla Recipe
Temperature Control for Optimal Serving Experience
Temperature makes or breaks the dahi bhalla experience. The yogurt base should always be served chilled – around 40-45°F is ideal. This cool temperature provides a refreshing contrast to the soft, warm bhallas and prevents the yogurt from becoming watery when it hits room temperature.
Prepare your seasoned yogurt base 30 minutes before serving and refrigerate it. Never freeze the yogurt as this destroys its smooth texture and causes separation. If you’re preparing ahead, store the whisked yogurt base in the refrigerator for up to 4 hours, giving it a gentle stir before using.
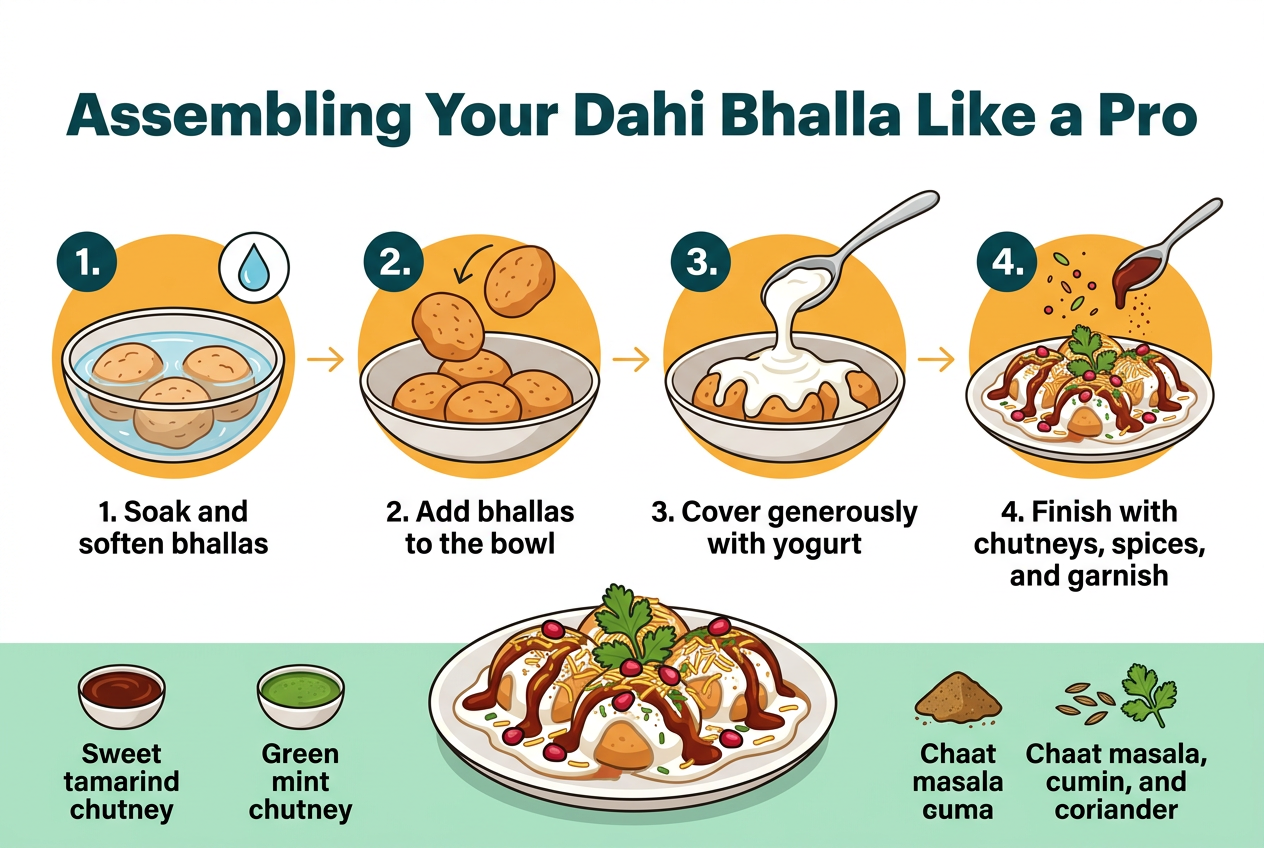
Assembling Your Dahi Bhalla Like a Pro
Soaking Bhallas in Water for Soft Interior
The secret to achieving that signature melt-in-mouth texture lies in properly soaking your fried bhallas. Once your bhallas have cooled completely, gently squeeze each one to remove excess oil, then immerse them in a bowl of lukewarm water for 15-20 minutes. The water temperature matters here – cold water won’t penetrate effectively, while hot water can make them mushy. You’ll notice the bhallas expanding slightly as they absorb moisture, transforming from dense, fried spheres into pillowy soft delights.
After soaking, carefully lift each bhalla and give it a gentle squeeze between your palms to remove excess water. Don’t press too hard – you want to retain moisture while eliminating the soggy exterior. This step is crucial for your Dahi Bhalla Recipe success, as properly soaked bhallas create the perfect canvas for the creamy yogurt and tangy chutneys.
Layering Yogurt for Even Distribution
Fresh, thick yogurt forms the heart of this beloved street food. Whisk your yogurt until completely smooth – any lumps will create an uneven coating. The consistency should be similar to heavy cream, flowing easily but not too thin. If your yogurt seems too thick, add a tablespoon of chilled milk and whisk again.Dahi Bhalla Recipe
Place the soaked bhallas in your serving dish, leaving space between each piece. Using a large spoon or ladle, pour the yogurt generously over each bhalla, ensuring complete coverage. The yogurt should pool slightly around the base while coating Dahi Bhalla Recipe the entire surface. Work quickly to prevent the bhallas from absorbing too much yogurt, which can make them overly soft.
Drizzling Chutneys in Perfect Proportions
The chutney application requires finesse and balance. Start with the sweet tamarind chutney, using a spoon to create thin, even drizzles across the yogurt-covered bhallas. Aim for a crosshatch pattern that covers about 60% of the surface. Next comes the green mint-coriander chutney – use this more sparingly as its intense flavor can overpower. A few strategic dots and thin lines provide the perfect flavor contrast.
The key is restraint. Too much chutney overwhelms the delicate bhalla and yogurt combination. Each bite should offer a harmonious blend where no single element dominates.
Adding Final Garnishes for Visual Appeal
Transform your dish from home-style to restaurant-quality with thoughtful garnishing. Sprinkle roasted cumin powder evenly across the surface, followed by a light dusting of black salt and regular salt. Fresh pomegranate seeds add bursts of color and sweet-tart flavor – scatter them generously for visual impact.
Finely chopped fresh coriander leaves provide a bright green contrast, while a light sprinkle of sev (fine chickpea noodles) adds textural interest. Some recipes include chopped onions or mint leaves, but keep garnishes balanced to avoid overwhelming the core flavors.
Expert Tips for Restaurant-Quality Results
Temperature Secrets for Crispy-Soft Contrast
The magic of perfect Dahi Bhalla lies in achieving the right temperature balance at every stage. Start by ensuring your oil temperature stays between 160-170°C (320-340°F) when frying. This moderate heat creates a golden, crispy exterior while allowing the inside to cook through without becoming dense or rubbery.
Your soaked urad dal should be at room temperature before grinding – cold dal won’t whip properly, resulting in dense bhallas. After grinding, let the batter rest for 10-15 minutes at room temperature. This allows the proteins to relax, creating that signature light texture.
When serving, contrast is everything. Keep your fried bhallas at room temperature while your yogurt stays chilled in the refrigerator until the last moment. This temperature difference creates an incredible sensory experience – the cool, tangy yogurt against the soft, room-temperature bhalla.Dahi Bhalla Recipe
Make-Ahead Strategies for Stress-Free Entertaining
Smart preparation transforms your Dahi Bhalla recipe from a last-minute scramble into an elegant presentation. Fried bhallas actually taste better when made 2-3 hours ahead, as they have time to develop their texture fully.
Prepare your chutneys up to two days in advance and store them separately in airtight containers. The green chutney maintains its vibrant color better when kept cold, while tamarind chutney actually improves in flavor over time.
Soak your bhallas in warm water 30 minutes before serving – this step can’t be rushed. Set up an assembly line with all components at arm’s reach: squeezed bhallas, seasoned yogurt, chutneys, and garnishes. This system lets you plate multiple servings quickly while maintaining consistent presentation.
Common Mistakes to Avoid During Preparation
Over-soaking urad dal ranks as the biggest culprit behind failed bhallas. Three to four hours is sufficient – longer soaking makes the dal waterlogged, resulting in flat, dense dumplings that absorb too much oil during frying.
Skipping the whipping stage during batter preparation creates heavy bhallas. Beat the ground dal mixture vigorously for 8-10 minutes until it becomes light and airy. Test by dropping a small amount in water – it should float immediately.
Water temperature matters when soaking fried bhallas. Lukewarm water works best; hot water makes them mushy while cold water prevents proper absorption. Many cooks also make the mistake of not squeezing the bhallas gently but thoroughly – excess water dilutes the yogurt and creates a watery mess.
Adding salt to the batter too early draws out moisture and affects the texture. Season just before frying for optimal results.
Storage and Reheating Methods That Preserve Texture
Proper storage keeps your Dahi Bhalla components fresh without compromising texture. Store fried bhallas in airtight containers at room temperature for up to two days. Avoid refrigeration, which makes them dense and chewy.
Never store assembled Dahi Bhalla – the yogurt makes everything soggy. Keep components separate and assemble just before serving.
For leftover fried bhallas that have become slightly firm, refresh them by steaming for 2-3 minutes or microwaving with a damp paper towel for 20-30 seconds. This gentle reheating restores their soft texture without making them mushy.
Frozen fried bhallas work well for emergency entertaining. Freeze them in single layers on trays, then transfer to freezer bags. Thaw completely and steam briefly before using. While the texture won’t match freshly made ones, they’re perfectly acceptable for quick preparation.
Store chutneys in small portions to avoid repeated exposure to air, which affects flavor and color.
Conclusion

Don’t let the process intimidate you – with fresh ingredients, proper timing, and a few pro tips like maintaining oil temperature and assembling just before serving, you’ll be creating these crowd-pleasing treats that rival your favorite street vendor. Grab your ingredients and give this recipe a try – your family and friends will be asking for seconds and the secret behind your perfectly balanced dahi bhalla.
Want to read more Famous Food about click here.
Big Shoutout to the guys who made this blog happen UDM.